Writing tests can improve both your coding skills and product reliability, helping you become a better developer by encouraging structured, concise, well-organized, and well documented code.
After Unveiling the Power of TypeScript in Vue.js Front-end Development last year, I was wondering how to improve my code reliability even further. While I had written some tests before, I didn’t fully understand their power and purpose. But in December 2023, I decided to commit seriously to code testing, and it's since become a core part of my workflow.
Therefore, this article will consist of two parts: theoretical and practical.
Theory: Why Test Your Code?
TypeScript provides type safety, but it doesn’t guarantee that your code meets functional requirements. That’s where testing comes in. Together, they are like a bullet-proof combo, ensuring great product quality and high stability. Tests can act as a functional documentation of code behavior. By reviewing test cases, new developers, QA testers, and even you (when revisiting old code) can quickly understand expected behaviors and features.
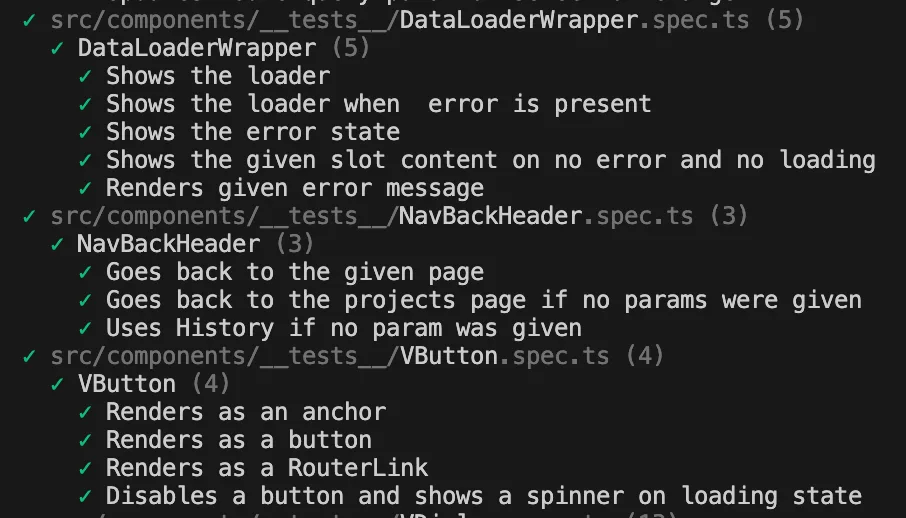
Good code coverage with tests can also ensure everything works as expected during refactoring. Furthermore, during test writing, you will understand how to write more easy-to-test code. And, therefore, it will be more flexible, better organized, following more best practices like dependency injection, separation of concerns, etc.
The Testing Pyramid
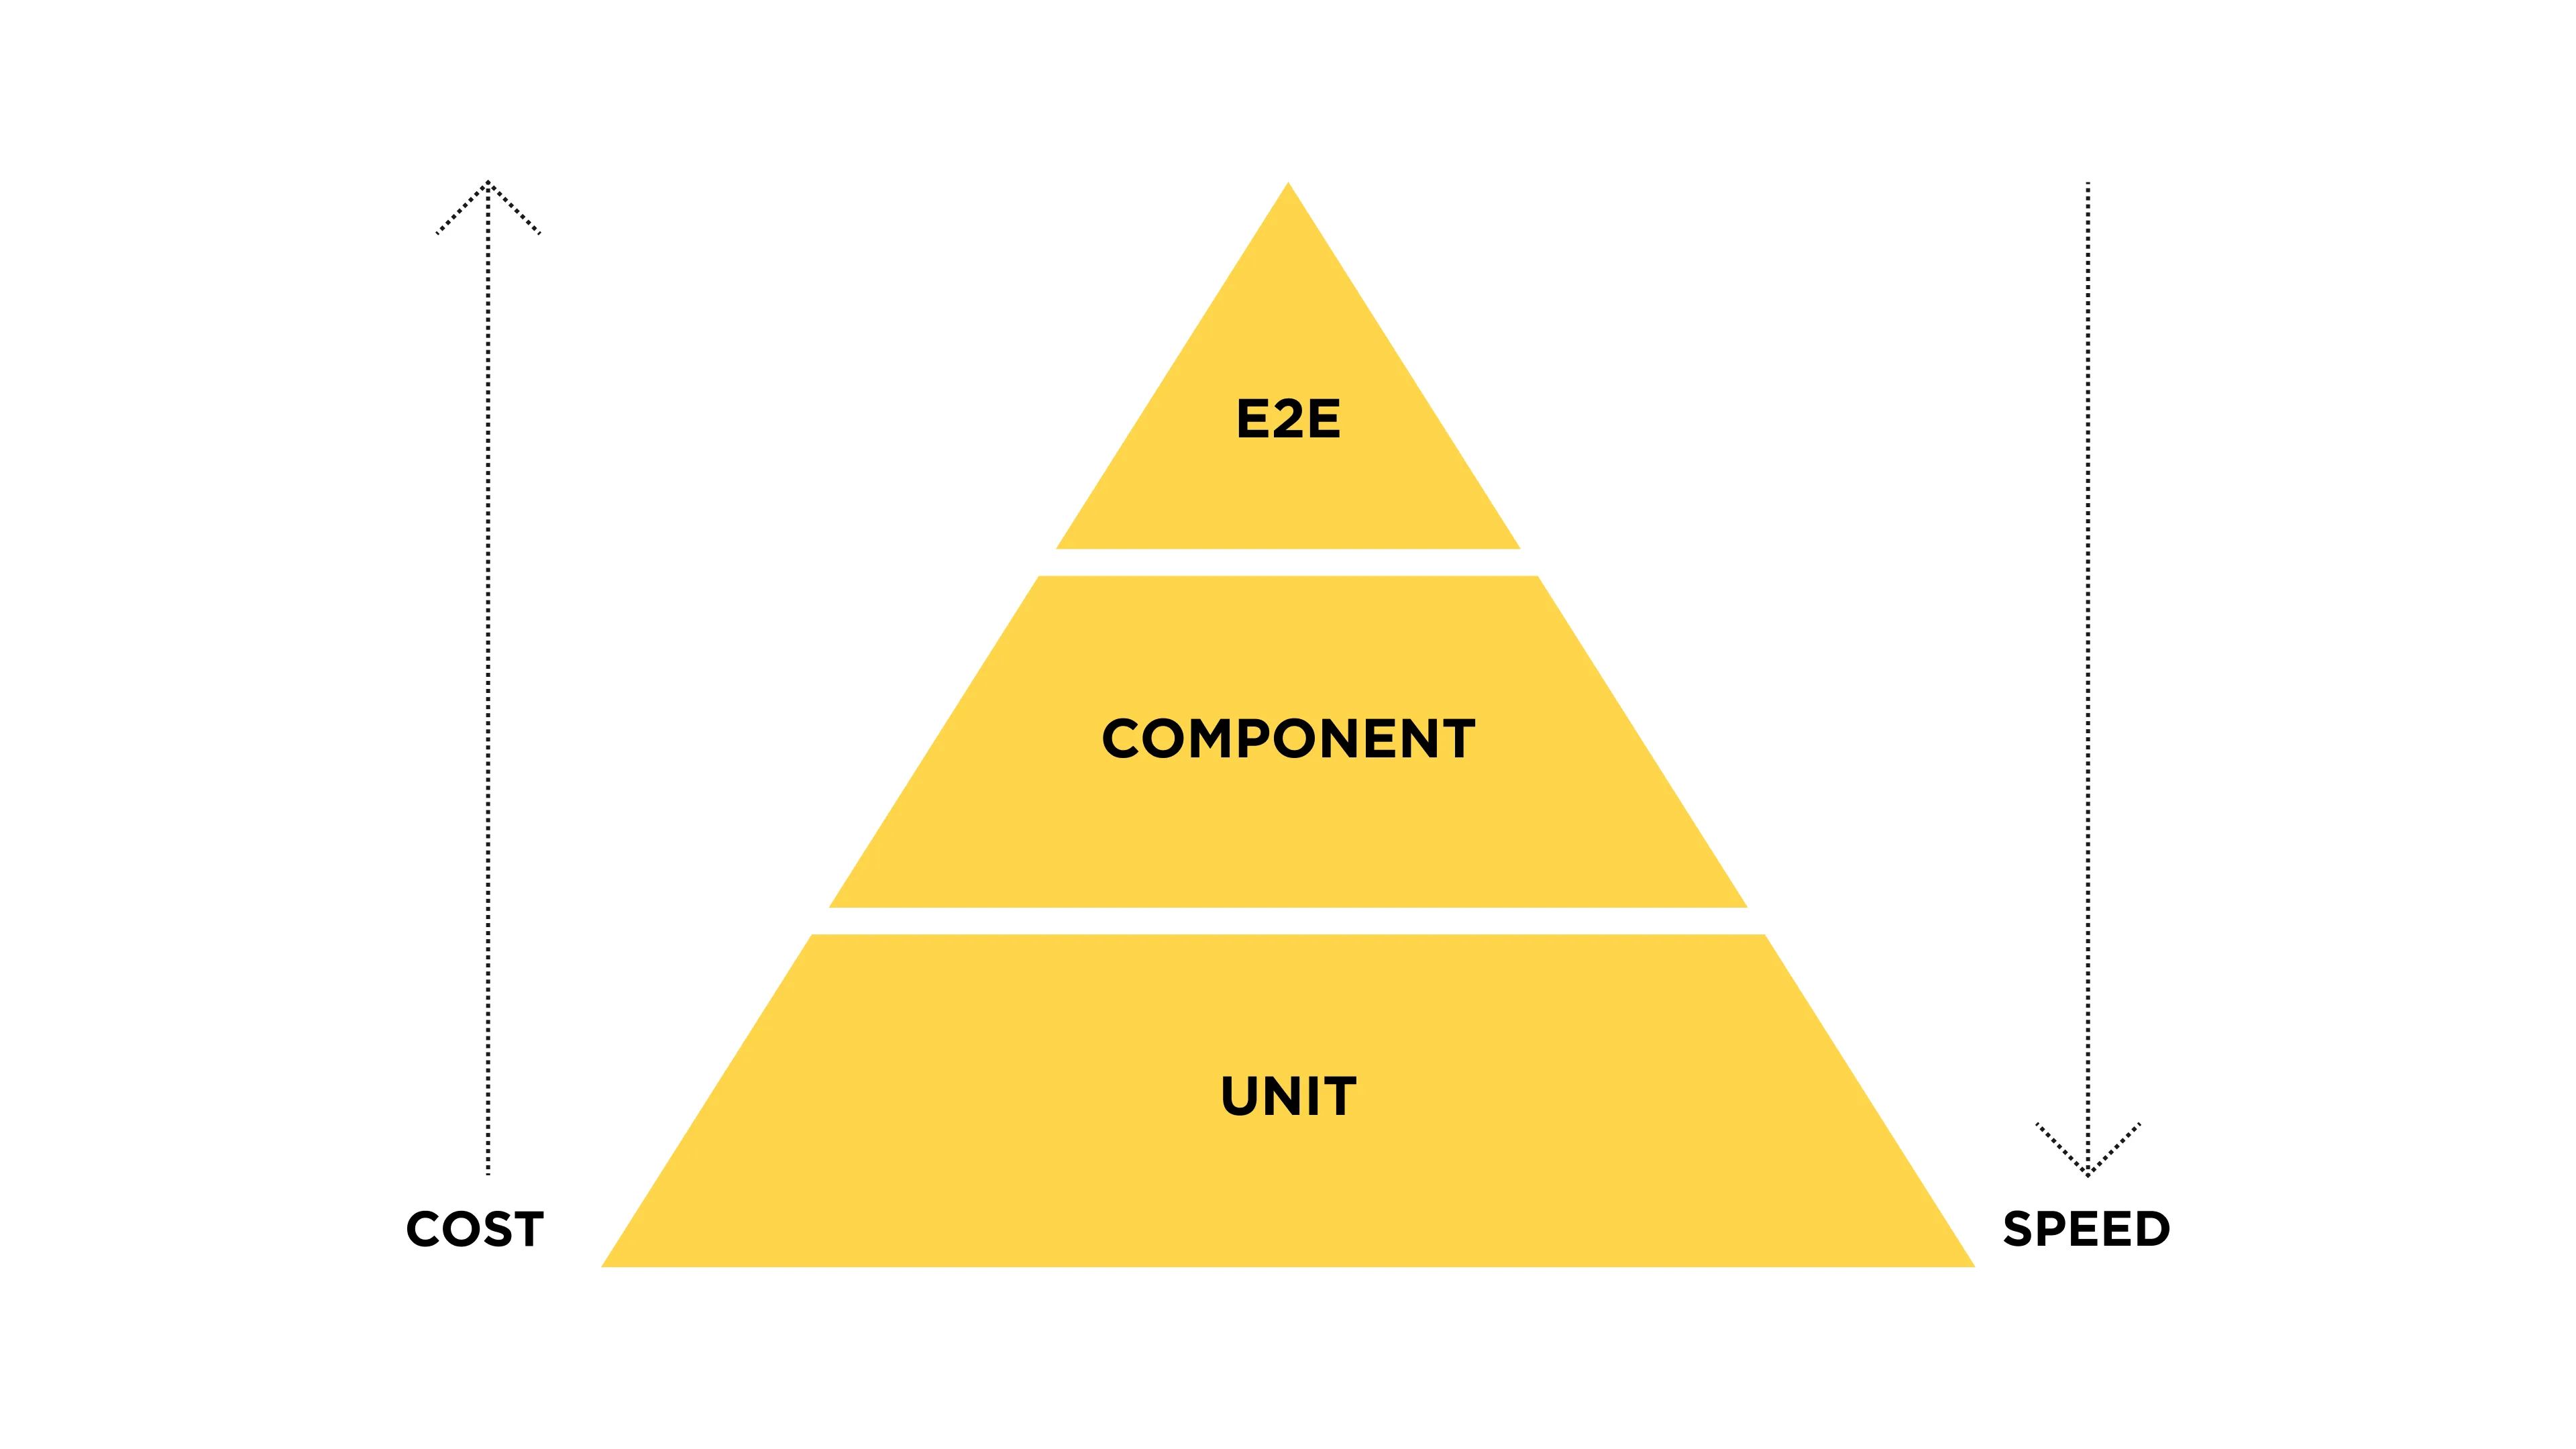
Testing typically includes three levels:
- Unit Testing: The fastest type as it tests the smallest possible module or “unit” independently from other modules.
- Component/Integration Testing: In the Vue.js ecosystem, this means testing your components; how they render, behave, and how they can be interacted with. This requires more setup (e.g. using vue-tests-utils, jsdom libraries) and more execution time.
- End-to-End (E2E): The slowest and the most complex type of testing because it simulates an end user by running tests in an actual browser and often involves standing up a database or other backend. This type of testing is good when you need to test navigation between pages, real network requests, native browser features, etc.
We have test running integration in every Pull Request build, and currently I use only the first two types of tests primarily for speed of execution. The limitation of these tests is the usage of the mocked DOM methods (e.g. with jsdom). For the most part, this should be more than enough, but there can be a case that relies on real DOM functions (like dialog and canvas methods, getBoundingClientRect(), browser animation methods, etc.). In these situations, consider using Vitest Browser (Note: this is currently experimental and requires more time to spin up a provider and a browser).
When to Test
I advise you to start writing tests as soon as possible. It is much easier to write tests as you develop rather than attempting to cover the code after its completion. Working with this method allows you to change your code as you write it to make it more testable. Additionally, I suggest test running integration during your development workflow. Because what’s the purpose of having tests if you don’t run them, right?
For example, instead of running the npm build script, create and run build & test command. I check that the Vue app build is successful by running my `build:test` command. I use Vite and Vitest as recommended options by the official Vue.js documentation. Here is a snippet of code below for Vite with Vue, TypeScript, and Vitest:
package.json
…
"scripts": {
   …
   "build": "run-p type-check \"build-only {@}\" --",
   "build:test": "run-p type-check build-only test:run",
   "test:run": "vitest run --reporter=verbose --reporter=junit",
   "build-only": "vite build",
   "type-check": "vue-tsc --build --force",
   …
 },
…
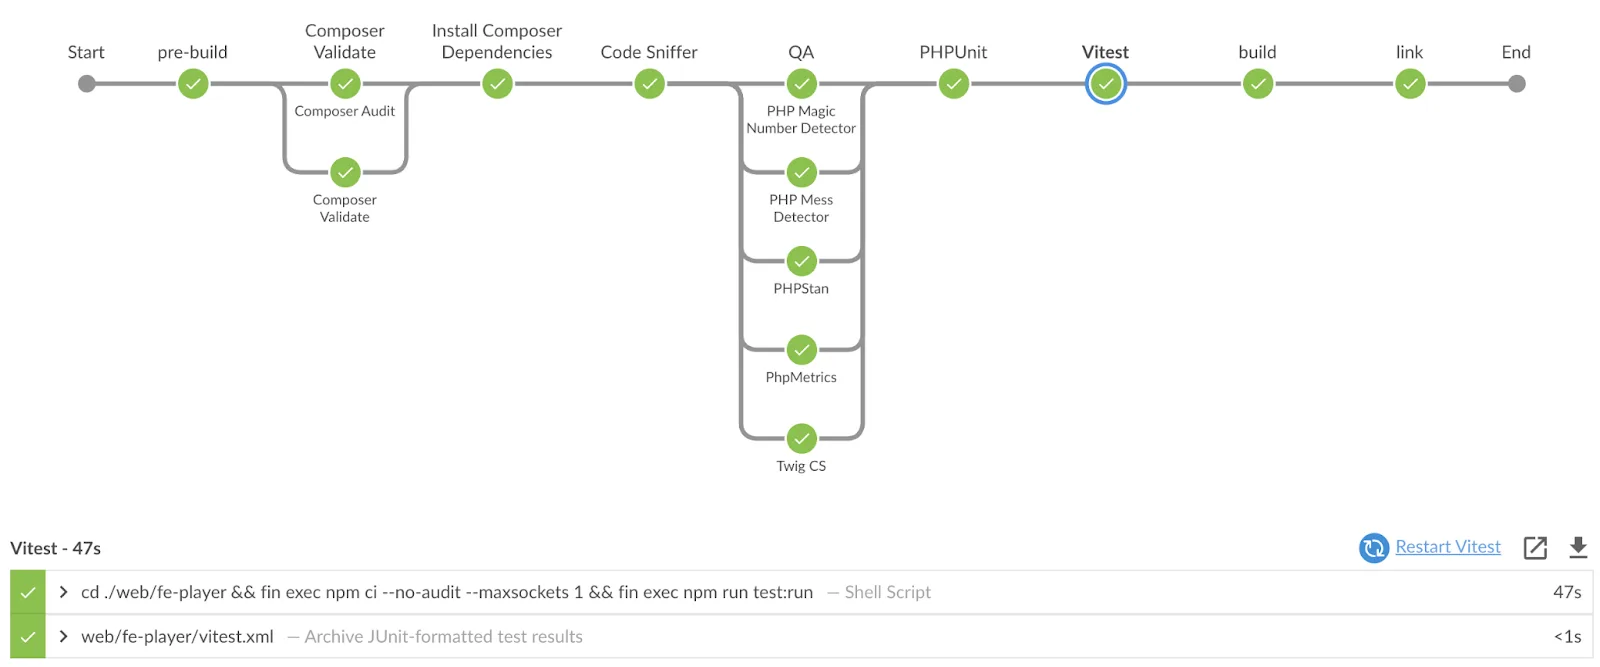
Furthermore, as mentioned above, we have a test running stage during the build of Pull Requests (PR). We integrated this piece of code into our Jenkinsfile:
Jenkinsfile
stage('Vitest') {
  steps {
    sh 'cd ./app && fin exec npm ci && fin exec npm run test:run'
  }
  post {
    always {
      junit 'app/vitest.xml'
    }
  }
}
This method will help you and your team run tests as a part of your workflow, keep tests up-to-date, and check for any possible code behavior errors during development.
Test Driven Development (TDD)
TDD is a great strategy to incorporate writing tests into your programming. Basically, it means writing a test that should fail and then writing just enough code to make the test pass. I use a modified scheme – firstly I write down all test cases as todo-s. Then I go one by one and make each test pass. The flow is represented in the diagram below:
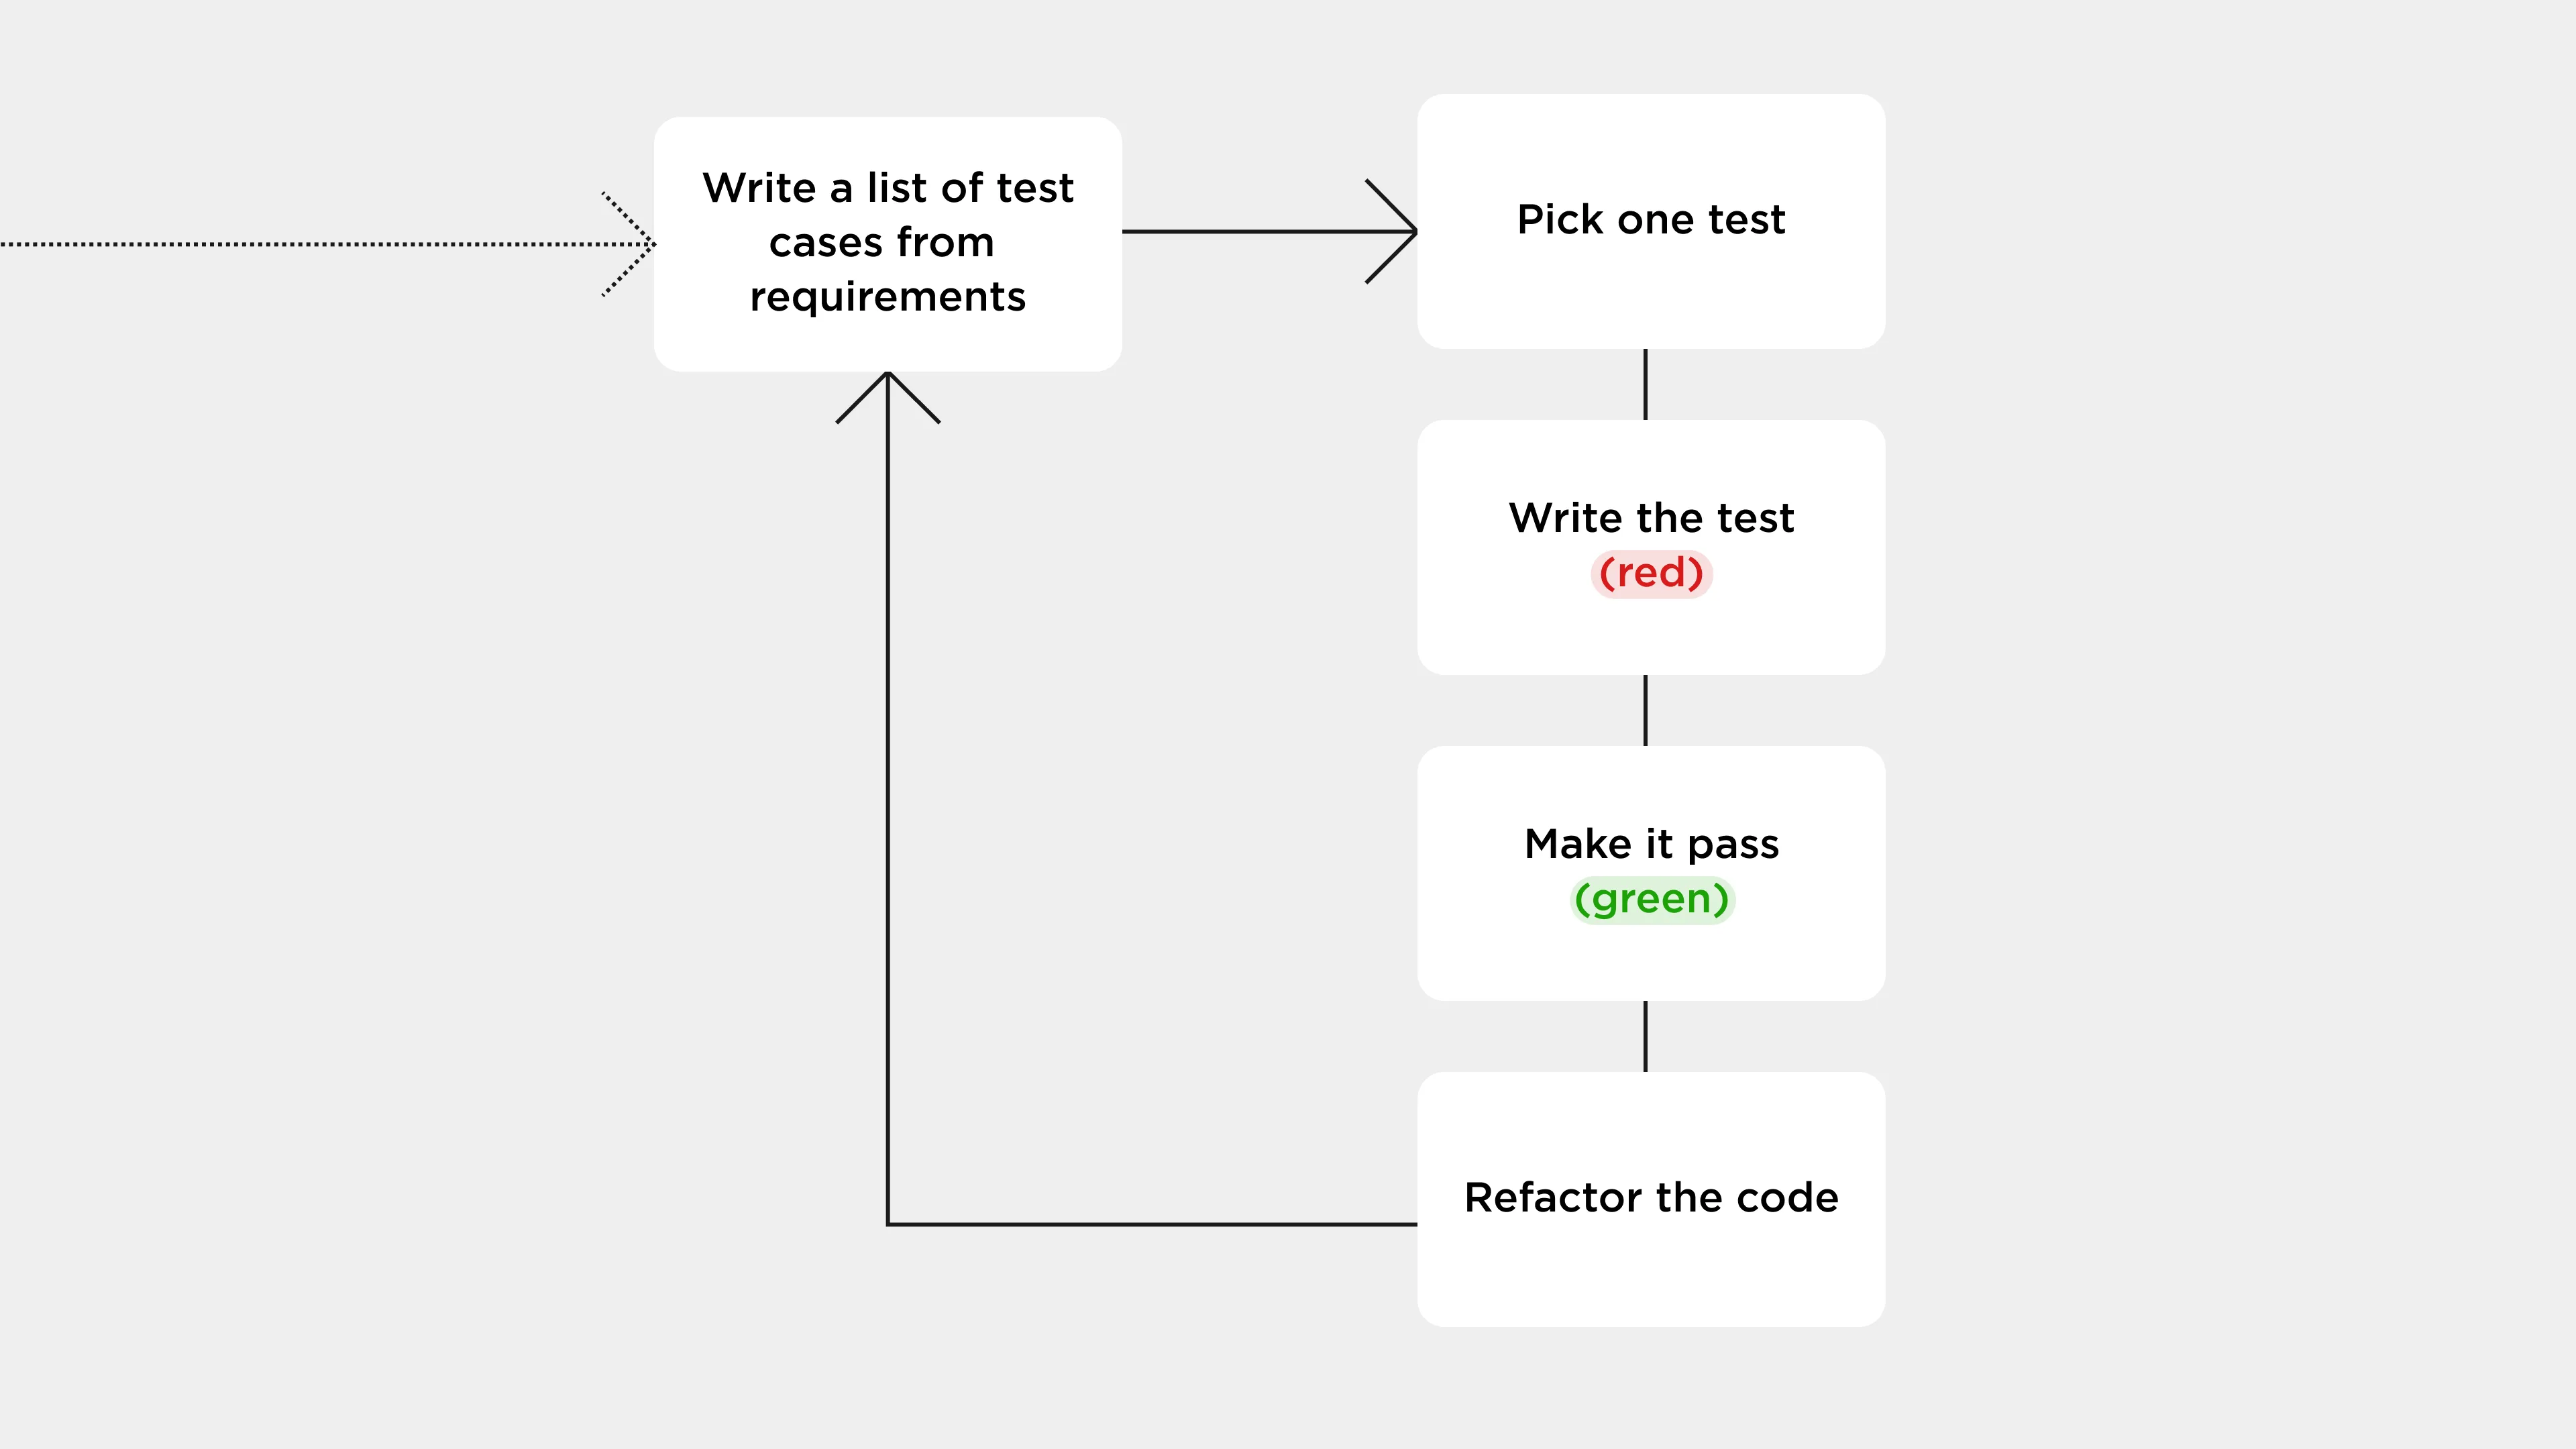
But speaking from my experience, TDD requires solid knowledge of how to write proper working tests and clear task requirements (acceptance criteria). Nevertheless, it is still worth trying. In the end, you will think about the code in terms of tests: what can be tested and how. And if it can’t be – the code should be rewritten.
Vue.js Testing: Do's and Don'ts
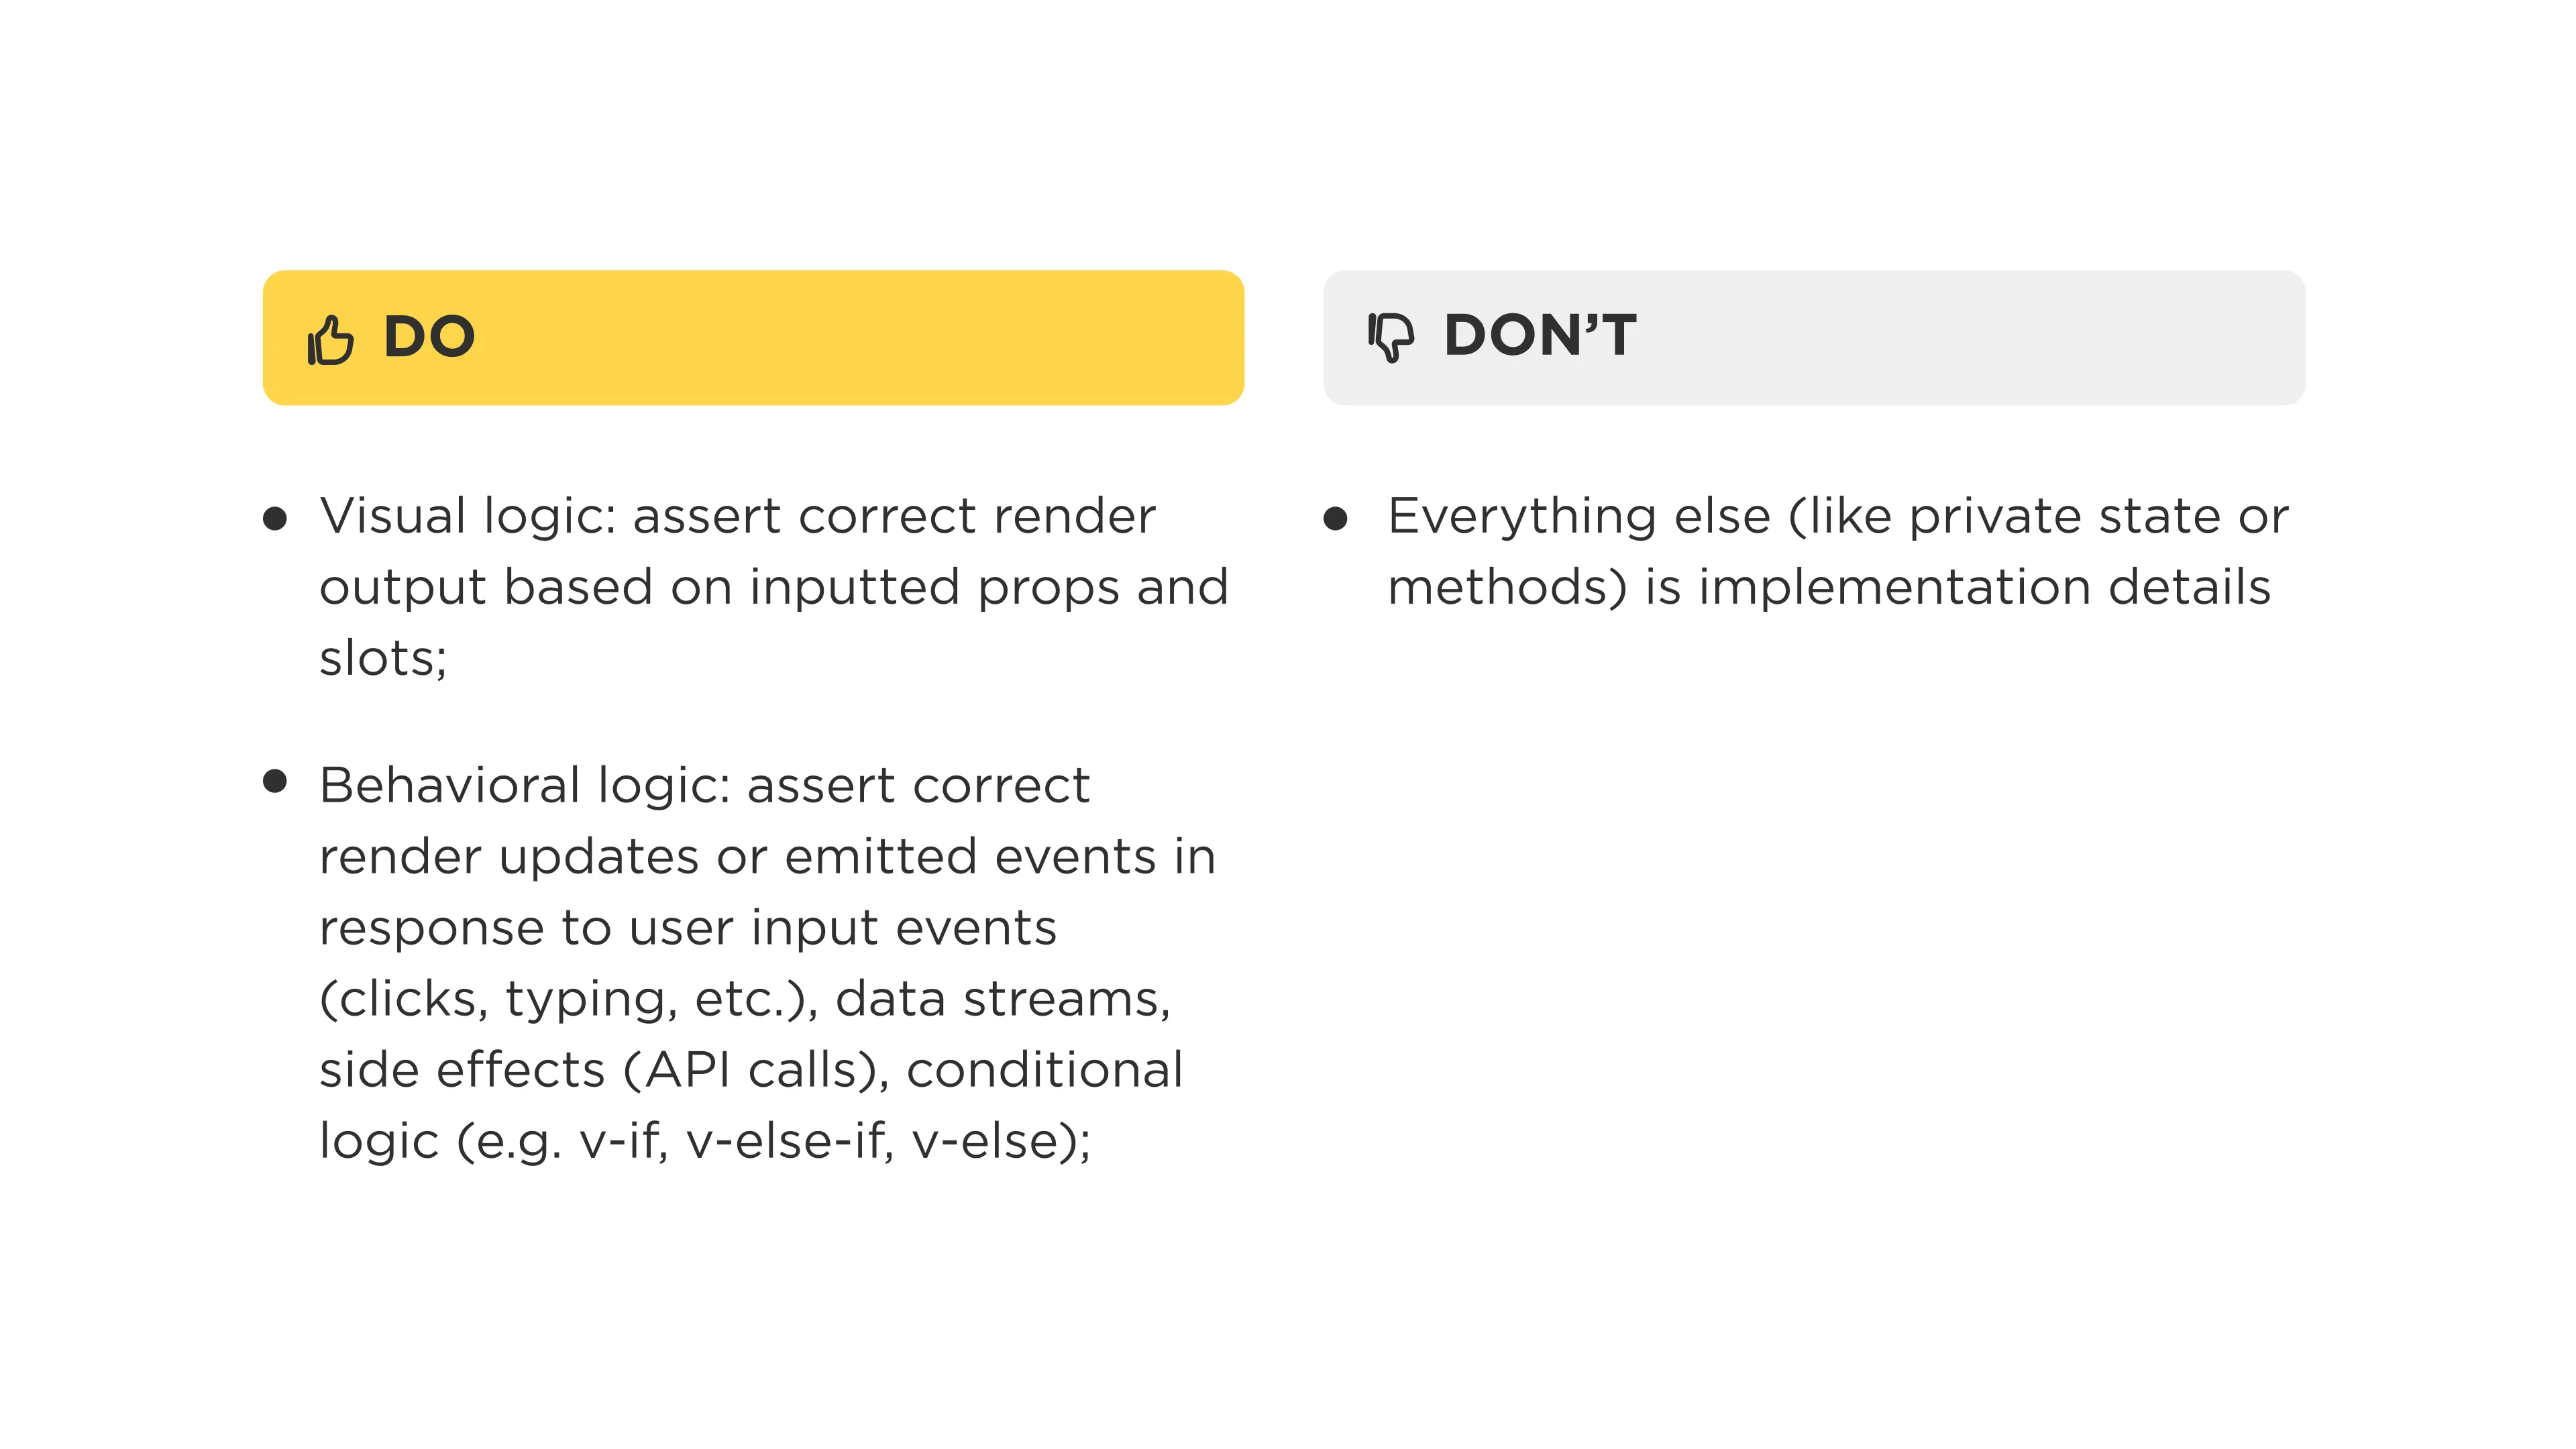
Think in terms of inputs and outputs from an end-user and a developer perspective. Consider a component like a black box with only inputs and outputs. Furthermore, the rule of thumb is that a test should not break on a refactor.
Coverage
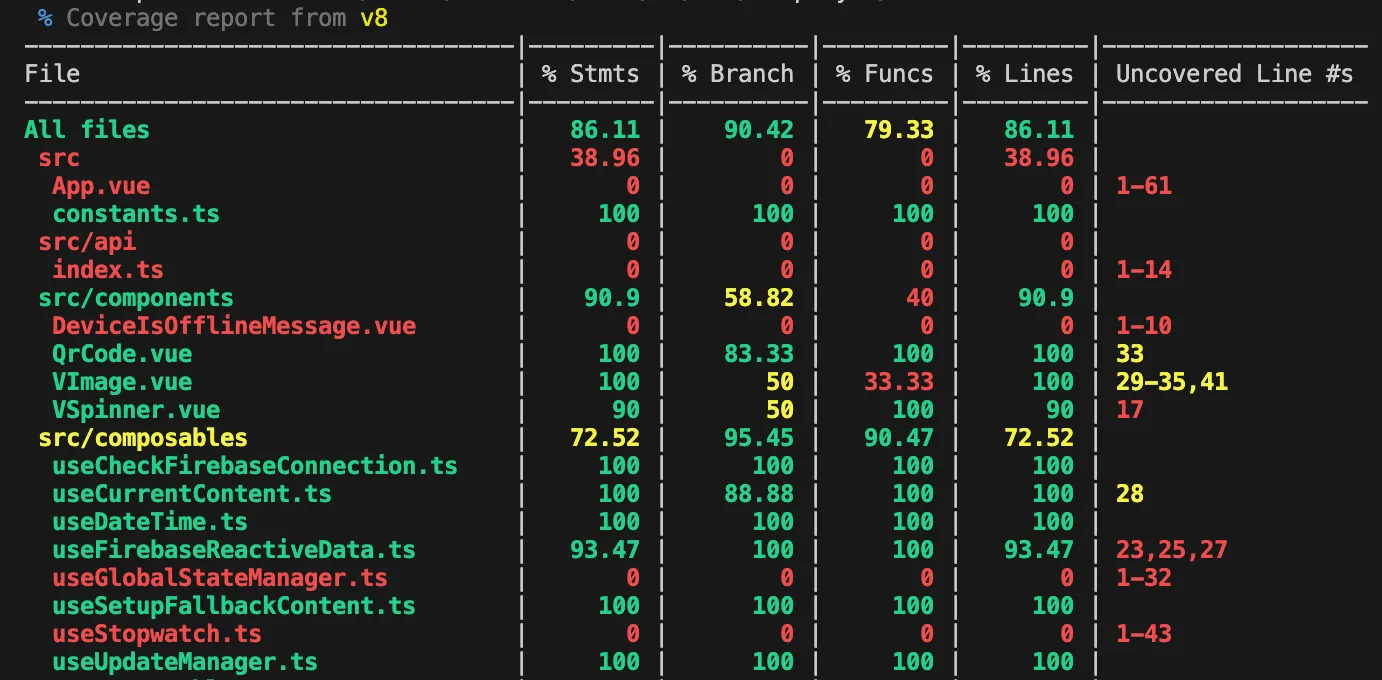
In my opinion, aiming for 100% coverage is pointless. Your efforts are better focused on covering the most important functionality with all subcases. For example, if a component just renders other components or DOM elements without any other logic - it doesn’t need a test.
At the same time, code coverage can help to identify what important pieces of code are not covered with tests.
Practical: Writing Better Tests
Crafting effective tests is about more than just coverage—it’s about clarity and resilience. By following best practices like structuring test files, using stable data attributes, and the AAA (Arrange, Act, Assert) pattern, you can create tests that are easy to understand and maintain. Here are some key insights to help you write better, more reliable tests:
- Don’t test the component’s inner logic (variables, functions, etc).
- DOM element ID and a class name can change so use a separate data attribute (e.g. data-test) to indicate that this attribute and the element are used in tests.
- Pattern of AAA (arrange, act, assert). Generally, it helps to have an expected test structure. In the arrange phase, you set up the scenario for the test. In the act phase, you act out the scenario, simulating how a user would interact with the component or application. In the assert phase, you make assertions about how you expect the current state of the component to be.
- If you don’t know how to write a test case now – leave it as test.todo(). You can return to it later and be reminded what piece of logic should be covered by this test.
- Follow a test file and folder structure. Just for example what I use:
- Create a __tests__ folder on the same level as a testing file.
- Place a mock data file into a __fixtures__ subfolder (if you have one).
- Wrap test cases with describe(“[YourComponentName]”, () => {...})
- If it’s a file with several exported utility functions, use describe() for every function.
- Write each test description with a third-person singular verb form what this test does. For example, test(“Renders a validation message on invalid form submit”, () => {...}).
- Create a __tests__ folder on the same level as a testing file.
- Have clear acceptance criteria for a task. That’s the fundamental base of your test cases.
- While you learn how to write tests, you can prevent false-positive tests by checking your tests by the expected failure of the opposite case (e.g. you expect some element to exist in DOM, change expect the condition to not exist → a test should fail → initial test works correctly)
- Cover all sides of a condition. Sometimes, you can think that if-else logic is too obvious and doesn’t need tests but believe me, it does. A small typo (like a forgotten else part in v-else-if) can suddenly lead to a bug that you have not expected.
Bonus Tips and Tricks
I advise you to read the Vitest and Vue Test Utils documentation to learn the full list of abilities you have for testing. Below, I collected some useful tips and tricks from different resources and my experience that can help you to find an answer to a problem.
- For better reusability, I created a component mount function with props. But at the same time, you need to tell TypeScript that a global scope wrapper variable is an actual wrapper after mounting. I resolved this issue with this typing:
const mountComponent = () => mount(YourComponent);
let wrapper: ReturnType<typeof mountComponent>;- If you need to pass all props to a component and don’t want to duplicate yourself by writing their types in a test file, you can use this code snippet:
type ComponentProps = InstanceType<typeof YourComponent>['$props']
function mountComponentWithProps(props: ComponentProps) {
 return mount(YourComponent, { props })
}- The Pinia team created @pinia/testing library and this comprehensive guide to improve the testing experience with store usage in your Vue app. An important point to notice: an initial getter value can’t be set in createTestingPinia() but it can be overridden in a test after mounting a component. If you use TypeScript, you need to suppress its error before the line of setting a value to a getter like here:
type ComponentProps = InstanceType<typeof YourComponent>['$props']
function mountComponentWithProps(props: ComponentProps) {
 return mount(YourComponent, { props })
}- Mocking modules. For example, a project uses Firebase RDB. But during testing its methods should be mocked. You can achieve this by mocking a module:
import { vi } from 'vitest'
vi.mock('firebase/database', () => {
 return {
   getDatabase: vi.fn(),
   ref: vi.fn(),
   onValue: vi.fn(),
   set: vi.fn(async () => new Promise((res) => res('')))
 }
})
Make sure that async methods with .then, .catch, .finally methods in the code are mocked with Promises, otherwise, they will throw an error.
- If you use importOriginal in vi.mock() with TypeScript, you probably need a type for that:
// Mock online state
const onlineMock = ref(true)
vi.mock('@vueuse/core', async (importOriginal) => ({
 ...(await importOriginal<typeof import('@vueuse/core')>()),
 useOnline: vi.fn(() => onlineMock)
}))- The example above also illustrates a case when you need to dynamically change a returned value from a function. So later on in a test, you can simulate different conditions:
 test('Stops offline timer on Internet connection renewal', async () => {
   onlineMock.value = false
   wrapper = mountComponentWithProps('PAIRED')
   const generalStore = useGeneralStore()


   onlineMock.value = true
   await nextTick()
   vi.advanceTimersByTime(DEFAULT_OFFLINE_TIMEOUT_SECONDS * 1000)


   expect(generalStore.appState).not.toBe('OUTDATED_CONTENT')
 })
Notice that Vue watchers usually require await nextTick() (a utility for waiting for the next DOM update flush) after an action. The example above also uses vi.advanceTimersByTime(). That’s a Vitest method to run timers by a given amount of time. Also, there is a vi.advanceTimersToNextTimer to call the next available timer.
- In order to use them you need to use fake timers first:
import { afterEach, vi, beforeEach } from 'vitest'
beforeEach(() => {
 vi.useFakeTimers()
})
afterEach(() => {
 vi.useRealTimers()
})
- With fake timers from above you can also mock the current datetime:
vi.setSystemTime(new Date(2024, 0, 1, 23, 59, 0))- flushPromises flushes all resolved promise handlers. This helps make sure async operations such as promises or DOM updates have happened before asserting against them. This method is also helpful when dealing with asynchronous Vue components. To change component props after component initialization you should use await setProps() method:
   wrapper = mountComponentWithProps()
await wrapper.setProps({ versionData: SomeMockedVersionData })- To test v-model you need to set a prop and an emit for it:
const wrapper = shallowMount(YourComponent, {
   props: {
     modelValue,
     'onUpdate:modelValue': (e) => wrapper.setProps({ modelValue: e })
   }
})
Notice that model emits in a component is named update:modelValue, without on prefix. If you have a v-model with an argument, just swap modelValue with it.
- If you need to mock a promise once in a test, you can use mockResolvedValueOnce or mockRejectedValueOnce:
 test('Shows an error message on API error', async () => {
   vi.mocked(api.getSomeList).mockRejectedValueOnce('Error')
   wrapper = mountComponentWithProps()
   await flushPromises()
   expect(wrapper.find('[data-test="error"]').exists()).toBeTruthy()
})- By default, jsdom doesn’t support native dialog methods. To avoid errors in tests, you can mock its prototype:
// Custom dialog workaround because JSDOM doesn’t support dialog methods yet
HTMLDialogElement.prototype.show = vi.fn(function mock(this: HTMLDialogElement) {
 this.open = true
})


HTMLDialogElement.prototype.showModal = vi.fn(function mock(this: HTMLDialogElement) {
 this.open = true
})


HTMLDialogElement.prototype.close = vi.fn(function mock(this: HTMLDialogElement) {
 this.open = false
})- For mocking Vue Router there is a handful article on Vue Test Utils website. Personally, I used a semi-mocked router to check if router methods like push, go, or replace are called in certain scenarios.
- If you use Element.animate() method in the code, you also need to provide a mock version for jsdom:
Element.prototype.animate = vi
 .fn()
.mockImplementation(() => ({ finished: Promise.resolve({ commitStyles: () => {} }) }))- If you have a form with a <button type=”submit”> you should trigger a submit event on the form element, not a click on the button:
await wrapper.find('form').trigger('submit')To ensure the validity of used fixtures in tests you can use two approaches: either export a constant with a type as const (if you use TypeScript) or parse the data (e.g. from a JSON file) via a parsing library (like zod).
- At some point, you can run into a situation where you use the same code snippets across all files. You can follow the DRY principle by using Vitest Setup files that will be run before each test. For example, you can have a vitest.setup.ts file. Here you can set up some of the mocks from the tips above or use your own. Furthermore, the setup file is great for setting global config values for Vue Test Utils (e.g. when using Tanstack Query or PrimeVue).
vitest.setup.ts
import { vi, afterEach } from 'vitest'
import { enableAutoUnmount } from '@vue/test-utils'
import { VueQueryPlugin, type VueQueryPluginOptions } from '@tanstack/vue-query'
import { config } from '@vue/test-utils'


enableAutoUnmount(afterEach) // Vue Test Utils component auto unmount


// Setting Vue Test Utils global config for each component mount
// Set TanStack plugin into global config
config.global.plugins = [
 [
   VueQueryPlugin,
   {
     queryClientConfig: {
       defaultOptions: {
         queries: {
           refetchOnWindowFocus: false,
           refetchOnMount: false,
           retry: false
         }
       }
     }
   } as VueQueryPluginOptions
 ]
]
And then you include this file into vite.config.ts (or vitest.config.ts if you have a separate file):
test: {
     …
     clearMocks: true, // Not to forget to clear mock calls between tests you can set autoclear in the config
     setupFiles: ['./src/vitest.setup.ts'],
     …
}
Here is also an additional configuration line for automatic mock call cleaning. This is useful to avoid unexpected test behavior when one mock is used across several tests and you check its invocation.
Sometimes you may need to mock some properties in window.location (like query params or reload method), but by default it’s not an easy task to achieve. Luckily, there is a vitest-location-mock library that can help you. Lastly, you can import this library in the setup file.
Final Thoughts
It is my hope that this article is helpful to front-end Vue.js testing beginners, as this was spurred by what I wish I had when I began my journey. In summary, writing tests can improve both your coding skills and product reliability. This will help you become a better developer by encouraging structured, concise, well-organized, and well documented code. Start small by integrating tests as soon as you begin writing code. Then, over time, you will naturally start thinking in terms of writing tests: how to split code, what should be passed as a prop for better testability, etc. Keep experimenting, refining, and finding ways to make testing an integral, and enjoyable, part of your workflow.


