Vue.js is a popular JavaScript framework for creating interactive and performant applications. In addition, you can use it as a library to add interactive elements/blocks to existing websites. In this article, we’ll show you how to add a Vue.js application to a Drupal 8 or a Drupal 9 site in 5 simple steps:
Now let's take a look at each step in more detail.
Create a custom module
Create a new custom module called module_name for the Vue.js application.
module_name/module_name.info.yml
name: Module Name
type: module
description: 'Provides functionality for ...'
package: Project Name
core_version_requirement: ^8.8 || ^9
dependencies:
  - projectname_system:projectname_system
version: 1.0
The dependency adds general Vue libraries to the site. You can also put them directly into this custom module, but we recommend having them in another module so that you can reuse them.
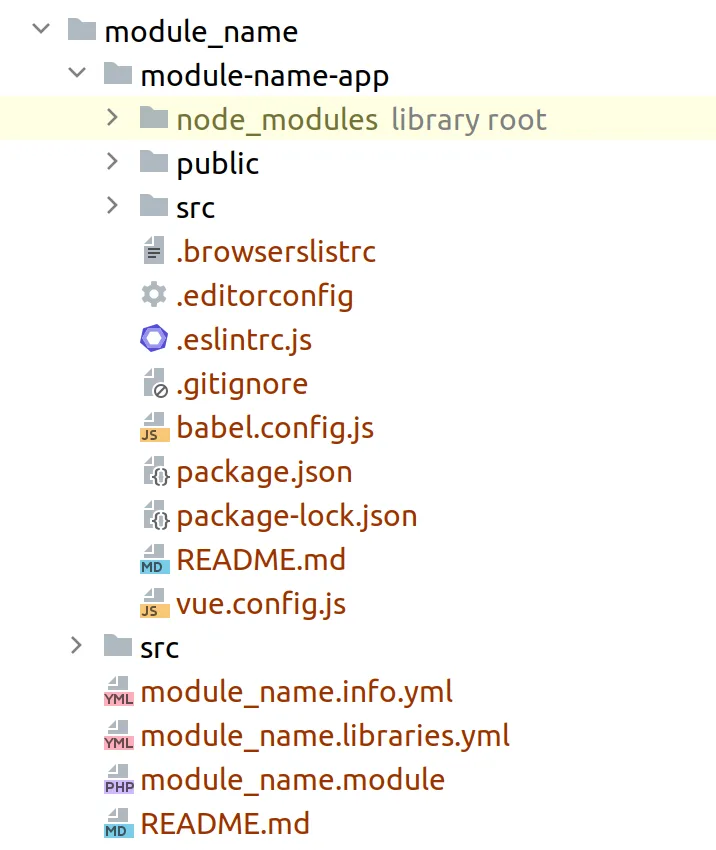
This custom module will also house the module_name.libraries.yml file (see below) and our Vue.js application directory (called ‘module-name-app’).
We should end up with this module structure:

Add Vue.js and related libraries
We recommend adding Vue.js and related libraries using CDN like Cloudflare. To add external JS assets to the Drupal site, you need to define them in the projectname_system.libraries.yml file where projectname_system is a general-purpose custom module:
projectname_system.libraries.yml
polyfill:
  version: 3
  js:
    https://cdn.polyfill.io/v3/polyfill.min.js: { type: external, minified: true }

vue:
  version: 2.6.11
  js:
    https://cdnjs.cloudflare.com/ajax/libs/vue/2.6.11/vue.min.js: { type: external, minified: true }
  dependencies:
    - projectname_system/polyfill

vue-router:
  version: 3.1.3
  js:
    https://cdnjs.cloudflare.com/ajax/libs/vue-router/3.1.3/vue-router.min.js: { type: external, minified: true }
  dependencies:
    - projectname_system/vue

vuex:
  version: 3.1.2
  js:
    https://cdnjs.cloudflare.com/ajax/libs/vuex/3.1.2/vuex.min.js: { type: external, minified: true }
  dependencies:
    - projectname_system/vue

axios:
  version: 0.19.2
  js:
    https://cdnjs.cloudflare.com/ajax/libs/axios/0.19.2/axios.min.js: { type: external, minified: true }
Polyfill is a library that allows modern code to work in older browsers, and Axios is one of the main libraries to execute requests to APIs.
This way, you can share library code with several Vue.js applications and not bundle them into every application. We usually put these definitions into a general module like projectname_system or projectname_master.
You can also put all these dependencies into the module_name.libraries.yml file of the custom module that contains the Vue.js application.
Create the application
Vue CLI is the de-facto standard to create new Vue applications. It helps you scaffold a new Vue application from scratch with minimal setup by generating the directory structure and settings for compiling the application, among other things.
You can use it to generate the application inside the module_name directory. You should put the application into this module’s subdirectory, for instance, module-name-app (see the resulting module file structure above).
npm install -g @vue/cli
vue create module-name-app
Preset: Manually select features
Answers to other Qs might vary depending on your application
Then we need to modify the package.json file to change the build target to the library. (Specifically, the build and dev commands – see Vue CLI build targets.)
module_name/module-name-app/package.json
{
  "name": "module-name-app",
  "version": "0.1.0",
  "private": true,
  “scripts”: {
    "serve": "vue-cli-service serve",
    "build": "vue-cli-service build --target lib --formats umd-min --name module_name_app src/main.js",
    "lint": "vue-cli-service lint",
    "lint-no-fix": "vue-cli-service lint --no-fix --max-warnings 0",
    "dev": "vue-cli-service build --target lib --formats umd-min --name module_name_app src/main.js --watch"
  },
...
}
Now you can use the npm run build command to build your application, npm run lint to run standard code checks, and npm run dev to have your application automatically recompile when you change the source code. The npm run lint-no-fix command can help CI environments check the code standards on builds.
Important note here is that Vue is externalized when building for the library target. To externalize other external libraries used in your application, you should modify the created vue.config.js file:
module_name/module-name-app/vue.config.js
module.exports = {
  lintOnSave: false,
  configureWebpack: {
    externals: {
      axios: 'axios',
      'vue-router': 'VueRouter',
    }
  }
}
It also makes sense to review the ESLint configuration in eslintrc.js. We recommend to use the plugin:vue/recommended set of rules:
module_name/module-name-app/.eslintrc.js
module.exports = {
  root: true,
  env: {
    node: true
  },
  extends: ['plugin:vue/recommended', 'eslint:recommended', '@vue/prettier'],
  parserOptions: {
    parser: 'babel-eslint'
  },
  rules: {
    'no-console': process.env.NODE_ENV === 'production' ? 'warn' : 'off',
    'no-debugger': process.env.NODE_ENV === 'production' ? 'warn' : 'off'
  }
}
Add compiled application assets
To add compiled application assets to the page, we also need to define a library with them:
module_name/module_name.libraries.yml
module-name-app:
  version: 1.0
  js:
    module-name-app/dist/module_name_app.umd.min.js: { minified: true }
  css:
    theme:
      module-name-app/dist/module_name_app.css: { minified: true }
  dependencies:
    - projectname_system/vue
    - projectname_system/axios
After defining this library, you can include it into Drupal 8/Drupal 9 rendering flow in three different ways.
Add the application library to every page
We can utilize the hook_preprocess_page() to add the library to every page.
module_name/module_name.module
/**
 * Implements hook_preprocess_page().
 */
function module_name_preprocess_page(&$variables) {
  $variables['#attached']['library'][] = 'module_name/module-name-app';
}
Attach the application library to block or paragraph
Blocks and paragraphs allow us to place our content into editor-controlled spaces on the sites and add the required assets only when the block or paragraph is present on the page.
By using the build method of a custom block, we can add the library to the returned render array:
module_name/src/Plugin/Block/ModuleNameBlock.php
/**
 * {@inheritdoc}
 */
public function build() {
  ...
  return [
    '#theme' => 'module_name_block',
    ...
    '#attached' => [
      'library' => 'module_name/module-name-app',
    ],
    ...
  ];
}
In case of paragraphs, we can utilize the hook_preprocess:
module_name/module_name.module
/**
 * Implements hook_preprocess_paragraph() for Type paragraph.
 */
function module_name_preprocess_paragraph__type(&$variables) {
  $variables[‘#attached’][‘library’][] = ‘module_name/module-name-app’;
}
Activate the Vue.js application
To activate the Vue.js application, we should have the HTML tag on the page, find it using JavaScript and mount the application to this tag.
You can place the HTML tag in the page.html.twig of the current theme (if you are adding the application to every page) or in the custom block template:
page.html.twig
...
<div class="module-name-wrapper d-print-none"></div>
...
module_name/module-name-app/src/main.js
import Vue from 'vue'
import App from './App.vue'

Vue.config.productionTip = false

let wrapper = window.document.querySelector('.module-name-wrapper')
if (wrapper) {
  let app = window.document.createElement('div')
  app.setAttribute('id', 'module-name-app')
  wrapper.insertBefore(app, wrapper.childNodes[0])

  new Vue({
    render: h => h(App)
  }).$mount('#module-name-app')
}
Then you need to implement your application logic in the App.vue file and compile it. Once that’s done, you should have it working on your site.
Also Read
How to add Bootstrap 4 to Drupal 8+


